I am a huge fan of the online photo editing site called PicMonkey This is an affiliate link: MomOf6 earns a commission if you purchase, at no additional cost to you. . I use it for all of my images and logos I use here on this blog as well as everywhere else I write on the web. I also love to use PicMonkey for digital scrapbooking! But one of my favorite things to do with PicMonkey is to create invitations, thank you notes, gift tags, and more for kids birthday parties! Creating personalized kids birthday party invitations and party stationery is easy, and is just one more way to make your at-home birthday parties special!
Step 1 to Create Kids Birthday Party Invitations: Find An Image
I want to take a few moments to talk about finding an image- because it's important to the invitation itself (it's what will make it so appealing), but you also don't want to “steal” an image off of the internet and assume that just because you found it online, it's okay for your personal use. So here are some ideas/guidelines:
Some of my very favorite invites to receive are ones that include a photo of the birthday child. If you are throwing a football-themed party, then a photo of your son wearing his flag football uniform is perfect! A girls' spa party? Your daughter with her hair wrapped in a towel and cucumber slices over her eyes would be adorable!
But if you really want to use some cool artwork or photography- then you need to make sure that the person who created that artwork or image has agreed that it can be used by anyone for personal use without charge. My favorite site to find free clip art for use on my site or kids' birthday party invitations is Clker.
Use the search bar at the top to look for an image. I've used the movie clapper board for a movie party, the sleeping camper for a campout party, and so many more images. You click on the image to select it and then download the image to your computer- it's free and easy.
But sometimes you want something cute or unique, and you can't find what you want on a free image site. That's when I head over to CanStockPhoto and search for an image that I would like to use.
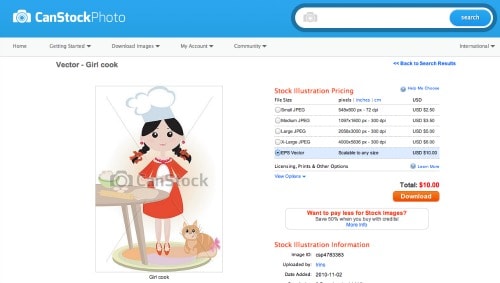
For example, if I were creating an invite for a girl's baking party, I might search for “girl baker,” and find this image that I would like to use. For $3.50 I can purchase the medium-sized .jpg image and be assured that I am allowed to use it on my invites and that the creator has been properly compensated. (Be aware of the use restrictions if you intend to perhaps “sell” your invites and not just create them for personal use!)
Step 2: Start with a Blank Card and Decide the Background Color
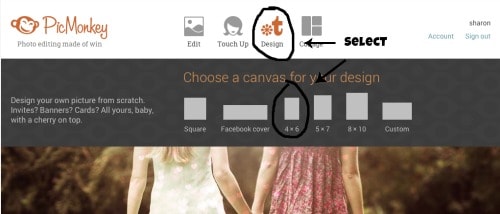
Head over to PicMonkey This is an affiliate link: MomOf6 earns a commission if you purchase, at no additional cost to you. and select Design, and then select the invitation size you want to create, usually a 4 x 6. If you want to modify a pre-made invite template, you'll find plenty to choose from, but this tutorial will show you how to create one from scratch.
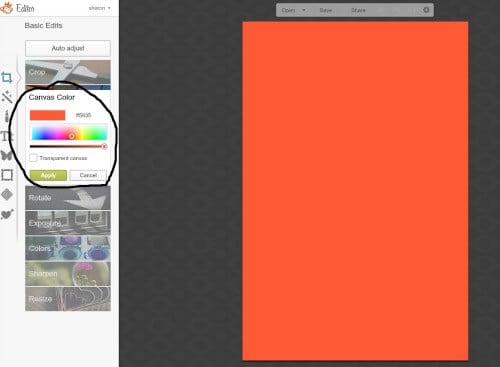
Choose the background color for your invitation, by placing your cursor in the color box and moving it around until you find something that looks good to you. For my example, I was going for a bright, orangey-red. Click Apply.
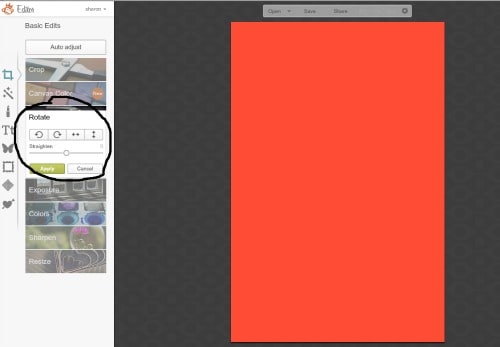
I usually create my invites in landscape mode, so if you want to turn your blank card sideways, select Rotate, and then click on the far left arrow button to turn the canvas.
Step 3: Add Your Image and Determine Placement
Now it's time to bring in your image. I am using the free image of the movie clapper board that I found over on Clker.
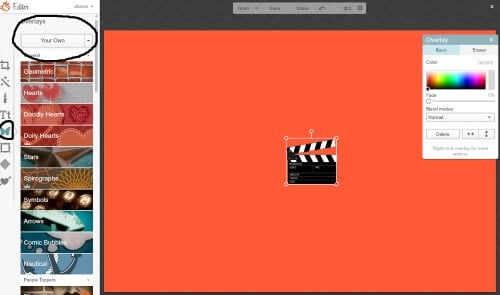
Click on the icon that looks like a butterfly which is the Overlay button, and then select the Your Own button at the top. A pop-up box will appear where you can select the image that you saved on your computer for your invite (in my case- the clapperboard). When you click Open, your image will appear over the background. It will be small in size, but don't worry- we can re-size it.
Grab one of the corners of your image and pull it to re-size- to make it larger. If your image becomes too blurry- that means it will also print blurry- so be careful about not using an image that is too small in its original size. You can drag your image around on your canvas to place it where you'd like.
Step 4: Add Text and Style It
Now it's time to put in all of that important information about your party!
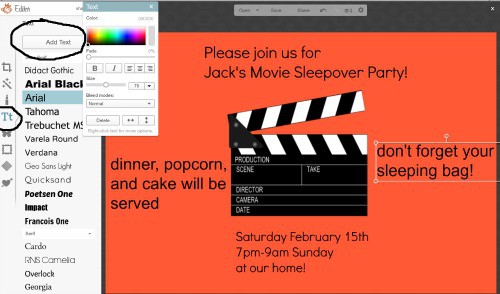
Click on the Tt icon on the left side to open the text window, and click the Add Text button at the top. A text box will appear on the screen which you can drag into the desired position, and then start typing your text in the box.
I typically will use several text boxes on an invite- one for each area. In this case, I created four different text boxes to contain all of my information. Now it's time to “style them.”
Click on the text inside one of your text boxes to select the text. I like to align my text to the center, which you can do in the text pop-up box, as well as change the color.
Along the left side of the screen is a list of available fonts. Click on the font name to change the font in the text box (you'll need to make sure you've highlighted the text first). Play around with different fonts until you create a look that you like!
You can change the size and placement of the text by dragging the text box into position or by pulling at the corners of the text box to make it larger or smaller (the more you play around with text boxes, the easier this will become!)
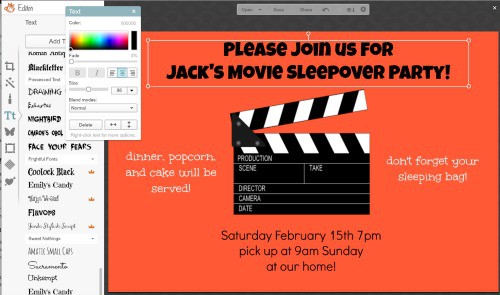
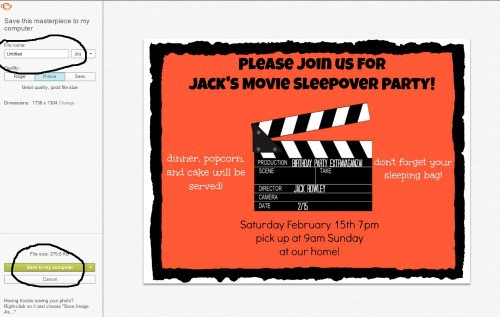
Here's what it looks like after I stylized my text boxes- center aligning them, selecting different fonts and colors, and moving them into my desired positions. I even added text on top of my clapperboard to fit the party theme!
Step 5: Add a Border
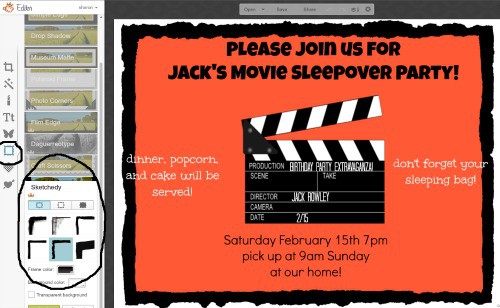
To add a cute border to the entire invite, click on the picture frame icon on the far left side, and then select one of the border styles from one of the buttons.
I love using the Craft Scissors button to add borders, but for this invite, I decided to use the Sketchedy frame. (Note: sometimes after adding the frame, you might need to re-position some of your images and text on the canvas again- but that's easy enough to do- just drag and drop!)
Step 6: Save and Print!
Click the Save button at the top of the screen, and then name your file and save it to your desktop! You can then print it and mail it to the party guests, or send it as an email attachment to get the word out about your event!
Once you play around with
PicMonkey
This is an affiliate link: MomOf6 earns a commission if you purchase, at no additional cost to you.
– you will realize that it is so easy to create your own birthday party invitations, thank you notes, favor bag tags, and more!






Amy says
Can you do this with the free membership or do you have to purchase a PicMoney Subscription? Thanks for your help!
Sharon Rowley says
You can do this with their free trial for 14 days (I believe), but then you would need to use the paid plan. But I find that the paid plan is worth it!
Laura Mutchler says
This is great! Thanks!!!!
Mackenzie Barter says
Thanks im familiar with the picmonkey software as i use it often but i like that you included the website with free photos!
i plan on throwing my bff a surprise party and i want it to be perfect down to the last napkin now her invites can be exceptional too!
Anonymous says
Hi , We love your Photo Scavenger Hunt idea! But, I would like to edit a few to fit our Hawaiian party theme. I saved it as you suggested as a jpg , however, I am still unable to edit the line items. The Pic Monkey tutorial did not help.
Is there an easy way to save this document and make some edits?
Thanks,
Dorian
Angie says
This has been so helpful! I can’t thank you enough. I currently live outside of the US and can’t find good invitations for my boys’ various parties – this is terrific.
Sharon says
So glad to hear that this tutorial is helpful to you! Thanks for letting me know! Good luck with your parties!
Tiffany says
These are great tips – thanks!