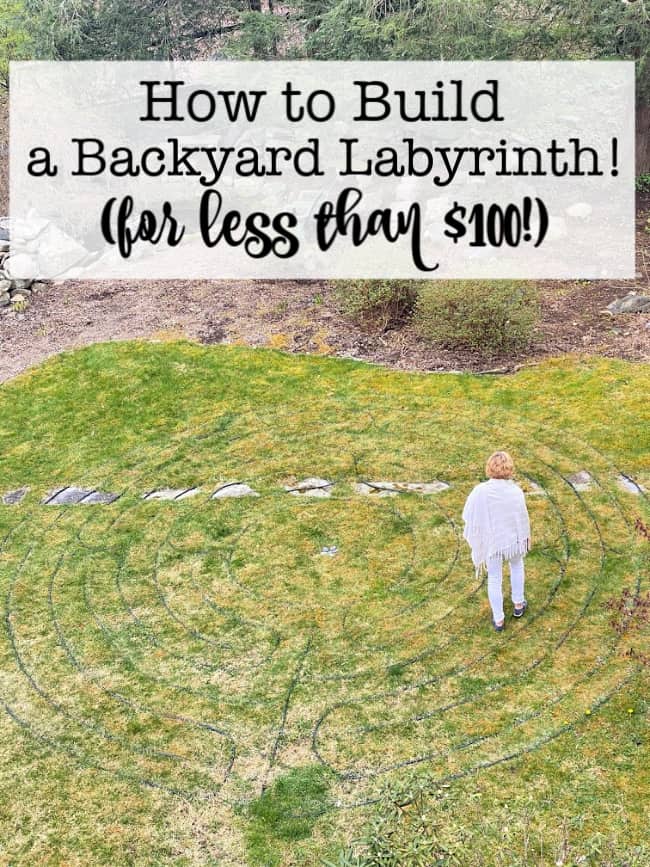
I love to walk in an outdoor labyrinth, using it as a relaxing walking meditation to calm my mind and relax my shoulders from the stress of the day as the path winds around and around. So I thought it would be pretty cool to have one in my own backyard! As it turns out, building a labyrinth isn't a hard thing to do- if you have my plan which shows you exactly how to lay out the paths! I was able to create mine in just one afternoon, and for less than $100!
What Exactly is a Labyrinth?
Essentially, a labyrinth is a single-path maze. Usually there is one entrance into the labyrinth that ultimately leads to a center circle. From there, the traveler can re-trace their steps back out along the winding path of the labyrinth until they reach the entrance again.
Labyrinths have a long history- they were a part of Greek mythology and can be found on coins as early as 430 BC. Labyrinths have also been found in petroglyphs in India and have been depicted in ancient Indian texts. And in medieval times, labyrinths were constructed on walls and floors of churches.
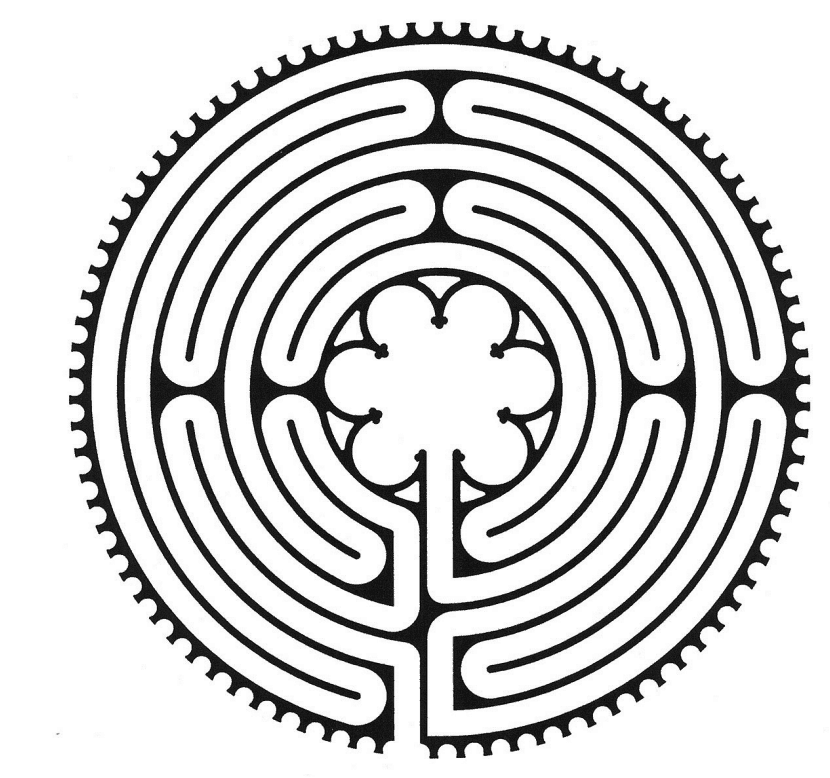
The most “famous” of these medieval church labyrinths can be found at the Chartres Cathedral outside of Paris. Constructed in the 1200's, it is a stunning 11-circuit labyrinth that is 42 feet square, which you can visit and sometimes walk it's winding path during certain days of the year.
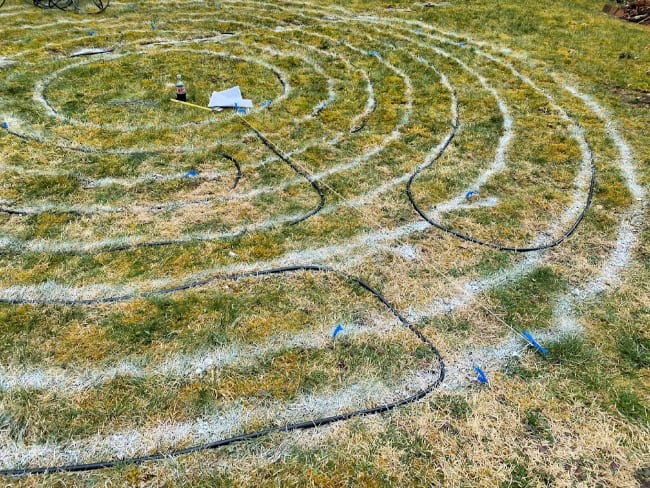
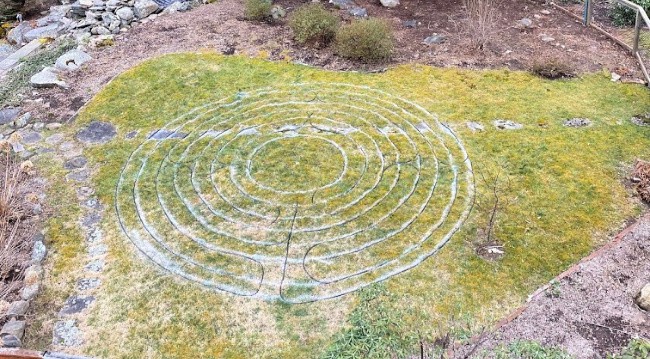
The labyrinth I created in my backyard and am sharing here is a 7-circuit version of the Chartres labyrinth:
What Do You Need for Building a Backyard Labyrinth?
You really don't need a lot of materials to build your backyard labyrinth, but what you do need- is space for it!
Labyrinth Site
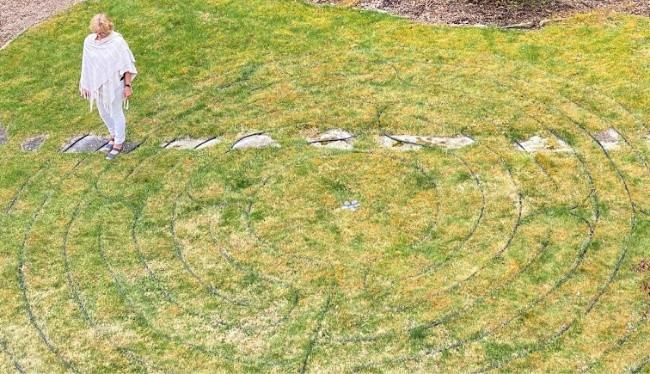
The 7-circuit labyrinth I built takes up 20 square feet- so you'll need an area at least that size that is clear of garden plantings and trees. In our yard, I have an area of grass with a stone pathway bisecting the yard. I decided to leave the stone path in place and build my labyrinth around it (because these stones would be hard to move!)
Another consideration when planning your labyrinth site is how you will care for the grass once the plastic tubing for the paths has been laid. In our case, we decided not to mow over the labyrinth with a lawnmower, but instead we use a weed trimmer to cut the grass within the labyrinth.
Materials List
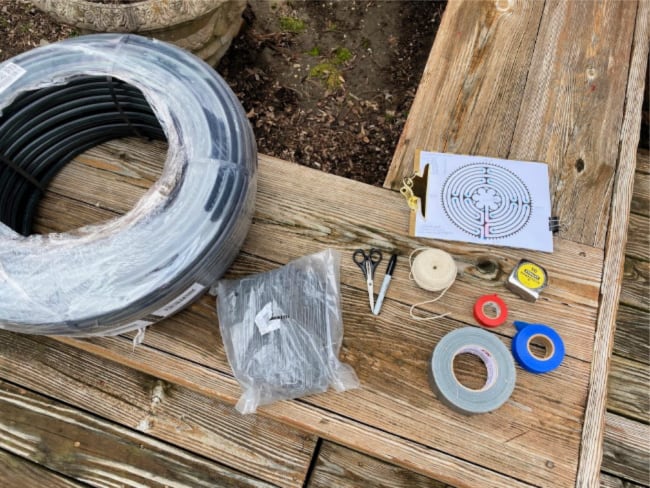
You'll need:
- Spray paint This is an affiliate link: MomOf6 earns a commission if you purchase, at no additional cost to you. (inverted marking paint used for athletic fields- so it can be sprayed upside-down)
- Cotton Twine This is an affiliate link: MomOf6 earns a commission if you purchase, at no additional cost to you. (string)
- Tape Measure
- 500 feet of 1/2″ black plastic tubing This is an affiliate link: MomOf6 earns a commission if you purchase, at no additional cost to you.
- 400 6″ lawn spikes This is an affiliate link: MomOf6 earns a commission if you purchase, at no additional cost to you. (I purchased the black carbon ones so they would be the same color as the tubing)
- Scissors
- Colored tape and a Sharpie to mark endpoints
Step 1 of Building a Backyard Labyrinth: Create your 8 Concentric Circles
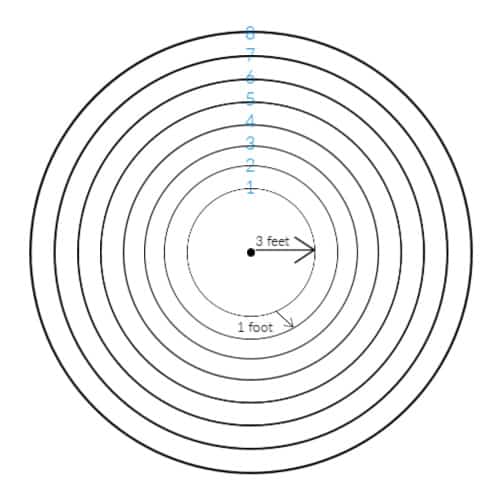
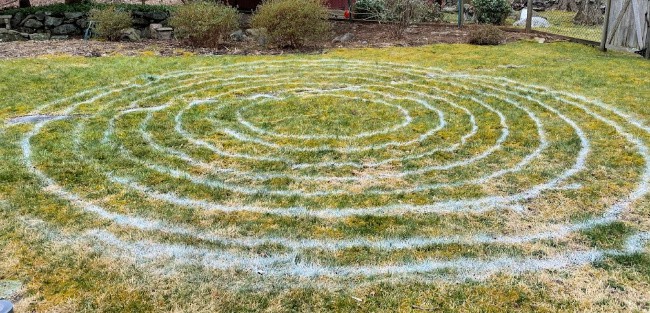
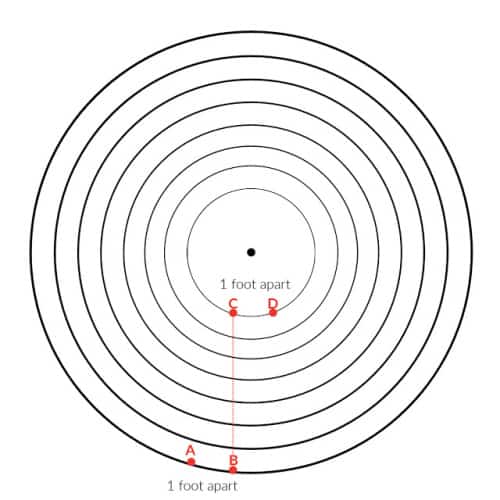
This 7-circuit labyrinth is constructed from 8 concentric circles, spaced 1 foot apart. The center circle has a radius of 3 feet- so that center radius plus 7 additional circles of 1-foot radius apiece means the radius of the entire labyrinth is 10 feet- or 20 feet by 20 feet in total!
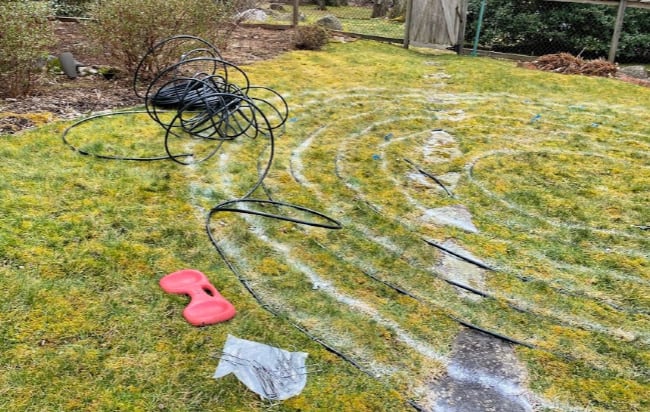
Start by determining where your center point will be, and place one of the lawn spikes at your center point. Tie a 10-foot string to the lawn spike (you may want to wrap rubber bands on either side of the string so the string won't move along the 1″ top of the lawn spike), and walk the entire perimeter of your 20-foot space to make sure that you don't run into any obstacles (low tree branches, etc).
Once you are satisfied with the placement of your center, use a rubber band (and your thumb!) to secure the end of the string to the side of your upside-down spray paint can, and mark your 10-foot wide circle (circle #8 above).
Cut 12″ off of the end of your string, and paint the next circle. Repeat this step 6 more times until all 8 circles have been marked.
And if you make a mistake while painting the circles? No problem- simply paint a corrected circle over your mistake. All of the paint will eventually grow out and be cut from the grass! As you can see from the photo above- I definitely made some circle corrections!
Step 2: Mark all of Your Endpoints
The first endpoints we will want to mark are the ones that indicate the entrance to the center circle, and the entrance to the labyrinth.
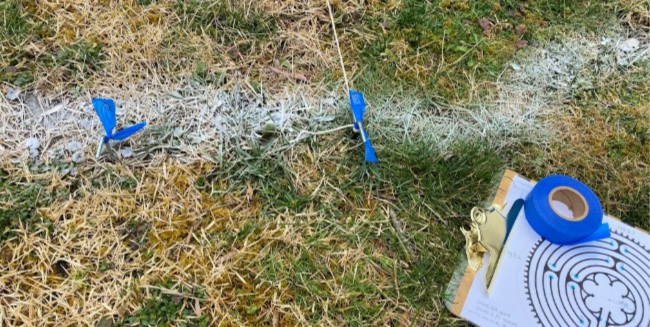
You can mark your endpoints using the lawn spikes, but be sure to tie a piece of tape to create a flag at the top so that they are easy to find in the grass. I also used a sharpie to write down the endpoint letter or number on the flag.
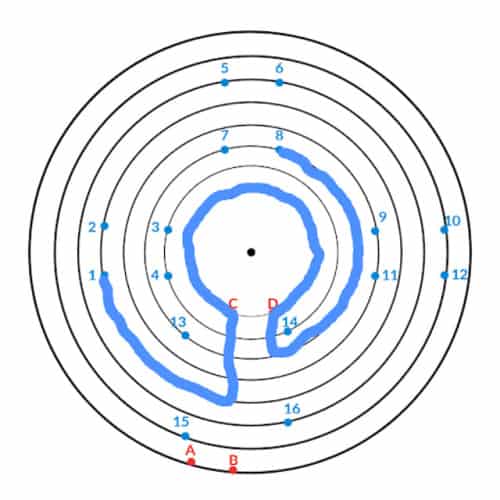
Start by marking the endpoints C and D, centering them at the “bottom” of your center circle (circle #1), and placing them 1 foot apart. After you've marked and labeled them, tie a string to endpoint C, and use it to create a straight line to the last circle (circle #8).
When that line is straight and at a 90-degree angle from the center of your labyrinth, place a lawn spike in the ground and mark it as endpoint B. Endpoint A is then placed on the outside circle, 1 foot to the left of endpoint B.
Leave your string between endpoints B and C in place.
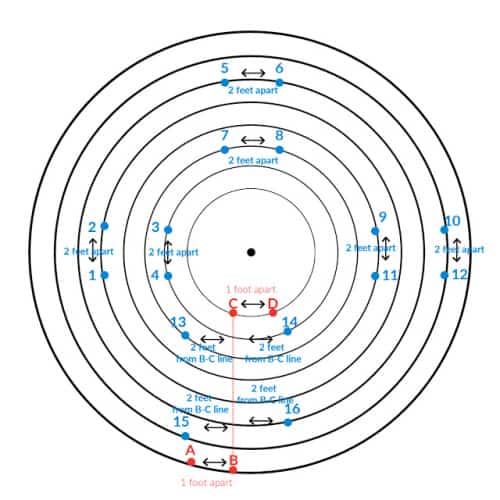
Now we are going to mark off the 16 endpoints that will help you to create the paths! We will start with endpoints 1-4 on the left side of the labyrinth.
Using your tape measure, extend it from the center of the labyrinth, out to the left at a 90-degree angle, so that you have a straight line to work from. In circle #5, mark endpoints 1 and 2, making them 2 feet apart from each other. (1 foot from either side of the tape measure line). In circle #2, mark the endpoints 3 and 4, setting them 2 feet apart from each other. (1 foot from either side of the tape measure line).
Now move your tape measure line to the top of your labyrinth and repeat the process. Mark endpoints 5 and 6 in circle #6, setting them 2 feet apart, and mark endpoints 7 and 8 in circle #3, placing them 2 feet apart.
Move your tape measure to create a 90-degree line to the right side of your labyrinth, and mark endpoints 10 and 12 in circle #7, and endpoints 9 and 11 in circle #4, spacing them 2 feet apart from each other.
For the endpoints on the bottom of the labyrinth- each of them will be placed on their own circle, and each of them will be measured 2 feet from the string line you ran between endpoints B and C. Endpoint 13 is placed on circle #3. Endpoint 14 is placed on circle #2. Endpoint 15 is placed on circle #7, and endpoint 16 is placed on circle #6.
It took me about 1 1/2 hours to paint my 8 concentric circles, and mark all of my endpoints. Now the real fun begins!
Step 3: Laying out the Black Plastic Tubing to Create the Paths
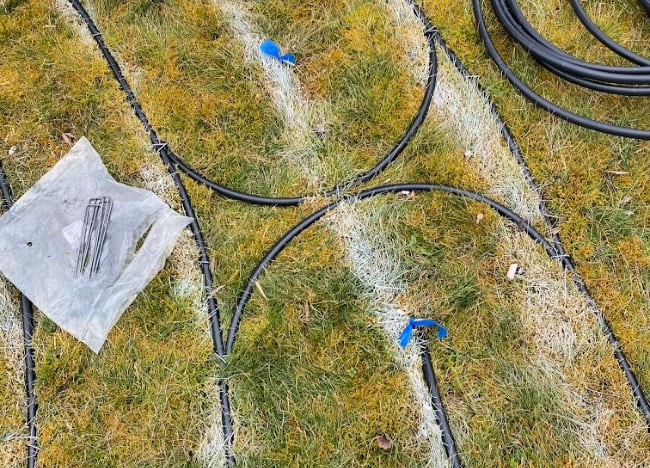
We will create the paths using 9 different “routes” of plastic tubing, securing the tubing to the ground in the curved shape using the lawn spikes placed about a foot apart, or whenever needed to maintain the shape desired. I found it easiest to “start” the lawn spike in the ground with my hand, but then step on the top of it with my foot to place it all the way into the ground.
A note about working with the plastic tubing: I removed it from the plastic wrap that it was shipped in (it was too hard to uncoil otherwise), and just uncoiled it as I created a route. But once I got to the point where the tubing began to kink and bend, I cut the tubing, secured the end to the ground using a lawn spike, and then continued the route using a second piece of tubing, uncoiling as I went.
I was careful to place the two cut ends in a continuous line and secured them with two lawn spikes in the shape of an X over each end so they wouldn't shift.
Some of the routes are quite long, and it took several long pieces of plastic tubing to complete them.
Route 1 (in blue):
Starting at endpoint 1, wind down around circle #5 until you reach the B-C string, and following the line created by the string, curve the tubing up to circle #1 (the center circle) to endpoint C, and then continue clockwise around circle #1 to endpoint D, and then create a curve with a 1-foot gap around endpoint 14 to circle #3, ending at endpoint 8.
Notes on Wrapping Around Endpoints with a 1-Foot Gap:
For a route, you'll always have a beginning endpoint and an ending endpoint, and in this case, the route goes right up and touches these beginning and ending endpoints.
But for endpoints that you curve around, when jumping from one to circle to another circle, you'll want to leave a distance of 1-foot around the endpoint. This is what creates the curve for that walking path.
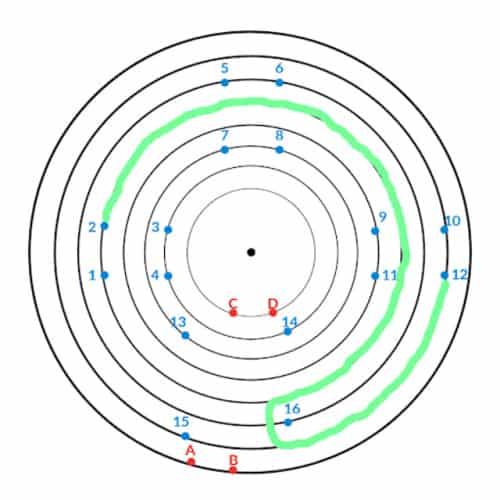
Route 2 (in green):
Begin at endpoint 2, and lay the tubing clockwise around circle #5, creating a 1-foot wide gap around endpoint 16, connecting to circle #7, and finishing at endpoint 12.
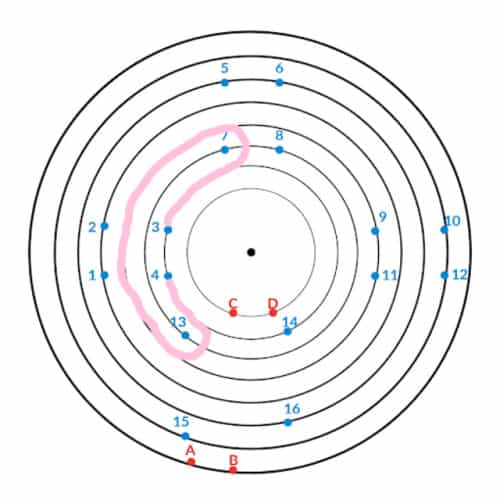
Route 3 (in pink):
Begin at endpoint 3, going clockwise on circle #2, looping around endpoint 7 (leaving a 1-foot wide gap), to circle #4, continuing counter-clockwise down circle 4, around endpoint 13 (leave a 1-foot wide gap), connecting to circle #2, and finishing at endpoint 4.
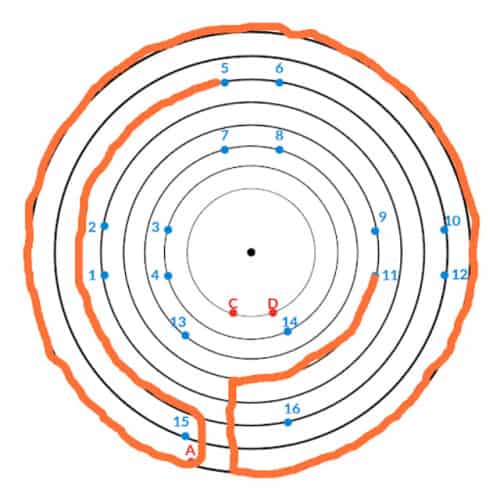
Route 4 (in orange):
This is your longest run! Starting at endpoint 5, head counter-clockwise around circle #6, wrapping around endpoint 15 (leaving a 1-foot wide gap), connect to endpoint A on circle #8, and lay the tubing clockwise all the way around circle #8, until you reach endpoint B. The tubing will follow the B-C string line up to circle #4, and then run counter-clockwise, finishing at endpoint 11.
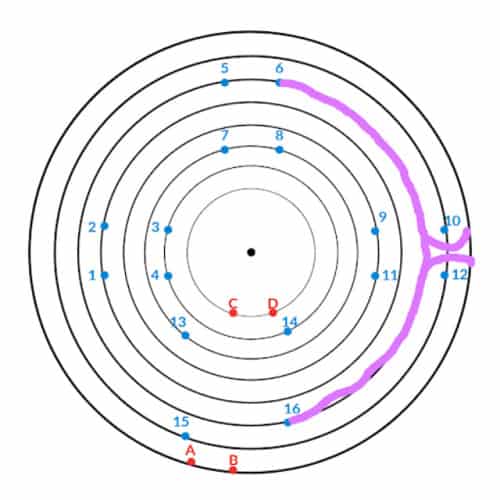
Route 5 (in purple):
Start at endpoint 6 and run clockwise around circle #6, finishing at endpoint 16. Next, cut tubing to create two curves connecting circle #6 to circle #8, wrapping around endpoints 10 and 12, leaving a 1-foot wide gap around those endpoints.
Route 6 (in red):
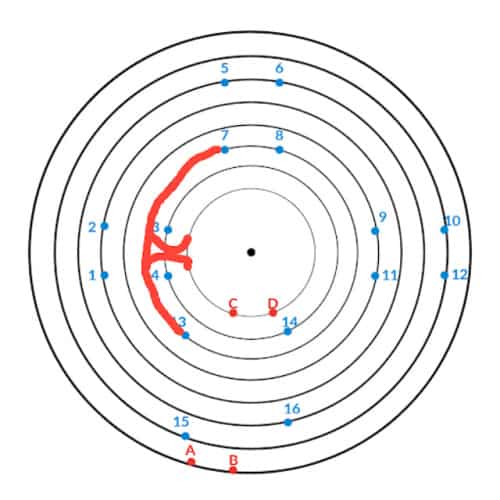
Start at endpoint 7 and run counter-clockwise around circle #3, finishing at endpoint 13. Next, cut tubing to create two curves connecting circle #3 to circle #1, wrapping around endpoints 3 and 4, leaving a 1-foot wide gap around those endpoints.
Route 7 (in maroon):
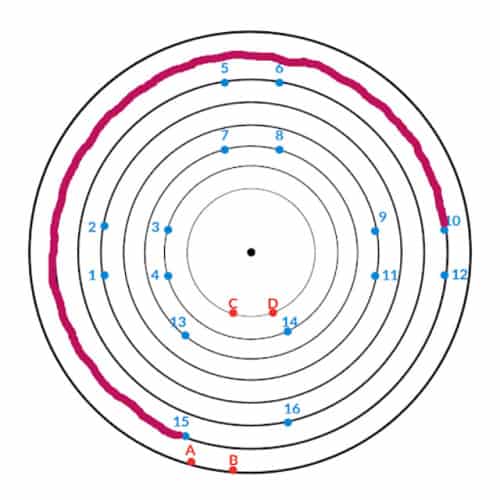
Start at endpoint 10 and run counter-clockwise around circle #7, finishing at endpoint 15.
Route 8: (in yellow):
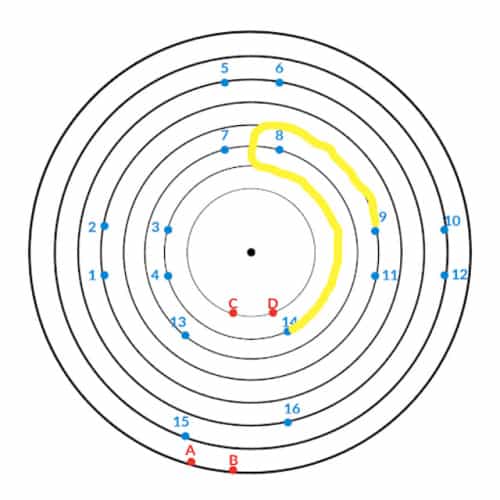
Start at endpoint 9, laying the tubing counter-clockwise around circle #4, wrapping around endpoint 8 (leaving a 1-foot wide gap) to circle #2, continuing clockwise to endpoint 14.
Route 9 (in brown):
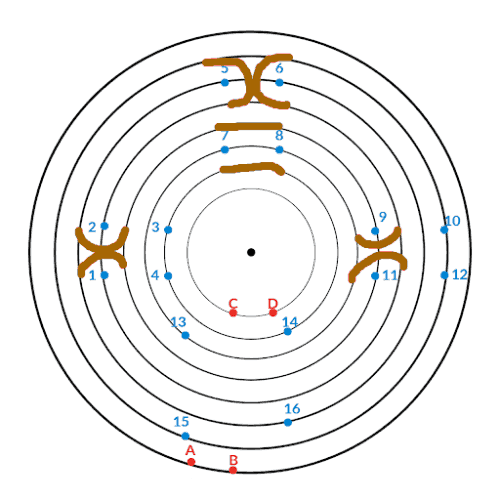
This isn't really a route at all- but it's laying connections to complete paths. There are 6 curved connections to make around endpoints (with a 1-foot gap around those endpoints). They are:
- From circle #6 to circle #4, around endpoint 1
- From circle #6 to circle #4, around endpoint 2
- From circle #7 to circle #5, around endpoint 5
- From circle #7 to circle #5, around endpoint 6
- From circle #3 to circle #5, around endpoint 9
- From circle #3 to circle #5, around endpoint 11
And then there are two straight-line connectors to complete the lines of the pathway- the first one is on circle #2 between endpoints 7 and 8, and the second one is circle #4 between endpoints 7 and 8.
And that's it! You've built your labyrinth!
Test Your Labyrinth!
Before you pull out all of the endpoints and the B-C string, walk your labyrinth to make sure that you set up all of the routes correctly!
Now you might find that your paths aren't perfectly 1 foot wide throughout your entire labyrinth. And that's okay! If you find that one path is too narrow, but the adjacent path is wide, you can move around your black tubing easily to make them more even. Or you can decide that imperfection is actually what makes your labyrinth perfect!
In a couple of weeks, once the grass grows and you can cut off the part where you spray painted your circles- your labyrinth will look even better!
For a quick sense of what it's like to walk the path of this 7-circuit labyrinth:
Thinking About Building a Larger Labyrinth with Wider Paths?
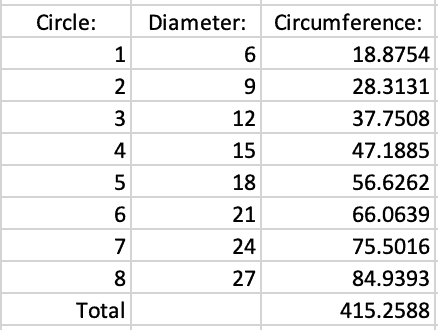
If you have a space larger than 20 feet by 20 feet, you can make your paths a bit wider. But then you have to be sure that you purchase enough plastic tubing to lay the path. Here's an example of the math needed to calculate the size and plastic tubing needed.
Let's say you decide you'd like 18″ wide paths, but you'll still start with a 3-foot radius in the center. Your 8 circles will measure (circumference = 3.1459 (pi) x diameter:
And you would need a space of 27 feet by 27 feet to create this version with 18″ wide paths.
Looking for more fun ideas you can do at home?
- How to Make Ice Cream In a Bag
- The Best Scavenger Hunt Ideas for Tweens (great games from around the web!)
- The Best Scavenger Hunt Ideas for Tweens (great games from around the web!)
- Teach Your Kids How to Play Crazy 8's!
So what do you think? Are you going to try building a labyrinth in your backyard?


Catherine says
i am so excited for these directions and to build ours come spring. I will be removing our grass and using mulch for the paths. question: is there a way to obtain your article that i can print?
Sharon Rowley says
Just print it from a desktop or a laptop
Bonnie J Schow says
Thank you for these wonderful directions. We created a labyrinth at our church using your plan. We made it twice as big and used donated bricks. It turned out really wonderfully and we will plant a garden around it in the next few months. I wish I could add a picture here to show you! Thanks again.
Sharon Rowley says
Oh- that is so wonderful to hear!! Please please send me a picture! [email protected]
Francis Sowers says
I would love to see it as well!
Shelley says
Can you mow over the tubing?
Sharon Rowley says
We use weed wacker rather than a mower to trim the grass in ours!