Installing a custom closet system to maximize the space in your kids' closets doesn't have to be expensive! You can save quite a bit of money if you are willing to do the measurements, design, and installation yourself- and it's not hard to do! Here's how we created a DIY Custom Closet for our two teen daughters that can help them to get organized with their clothing- in just one weekend!
*Please note that some of the links in this post are affiliate links, which means I will make a small commission if you purchase through these links.

Why Install a Custom Closet for a Kids Closet?
Back when my oldest two boys were little, and we were transitioning their shared bedroom from a baby/toddler room to a “big kid” bedroom- we looked into having a company come out and install a beautiful custom closet system for them.
We wanted them to have plenty of shelving space and a few drawers in their closet so that we could skip having dressers and drawers in the bedroom, which can be expensive and take up lots of floor space- something that is at a premium when two kids share a bedroom!
We made an appointment, and this person came out and did all of the measurings, asked us a ton of questions to help us figure out how we would design the closet space, and then left us with a written estimate.
And holy cow! It was MUCH MORE than we wanted to spend on a kids bedroom closet! Especially knowing that down the road- we would want to do this in two other kids bedrooms as well!
But still- we valued the idea of giving them more floor space in a shared bedroom and maximizing the space available in their bedroom closet.
How to Build an Affordable Closet!
We researched how we might be able to DIY this project and come up for a more affordable closet solution- and that's when we found EasyClosets This is an affiliate link: MomOf6 earns a commission if you purchase, at no additional cost to you. ! Basically- if you are willing to tackle the installation yourself (which take a couple of hours, but it totally do-able!)- you can SAVE HALF!
Designing a DIY Custom Closet
It all starts with the measurements.
Since most walls are not perfectly square- you'll want to measure your back wall and both sides walls in three different places (near the top, in the middle, and near the bottom), and then use the smallest of the three measurements to design your closet.
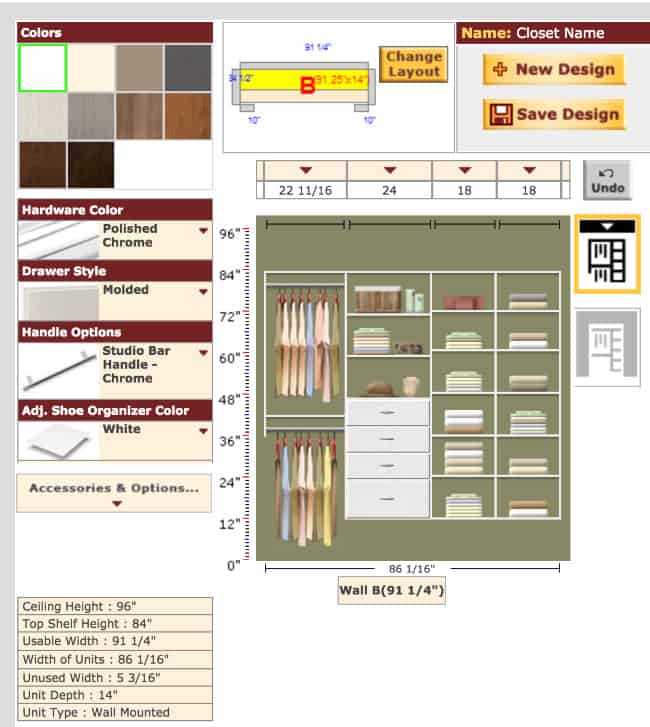
Use the online project designer to play around with your closet ideas. It is easy to click around and see how your closet will look with more or fewer shelves, hanging bars, hutches, baskets, and drawers. (But keep in mind that certain components like soft-close drawers are going to significantly increase the price of your closet.)
But also know that in installing a beautifully designed custom closet, you are adding an upgrade to your home- one that gives you a potential return on your investment later when you eventually sell your home. Purchasing bedroom furniture for the kids will not add value to your home!
Should you run into any questions about your design- feel free to reach out to an EasyClosets design consultant for help! (800-910-0129)
Easy Closets Installation
One of the things that impresses me about Easy Closets is their fast shipping. Within two days the 14 boxes of components for our closet arrived on our doorstep! It is packed very carefully so as to avoid damage in shipping- so just know you will have plenty of materials to recycle after you unpack everything.

Each box is carefully labeled with what is contained inside- making it easy for you to find what you need during installation.
Find your instructions manuals
One of the boxes will say “Open First”- it contains the instruction manual. Open that box a day or two in advance of the day you plan to install it, and read through them before you begin. Within these manuals you will find a complete component list of everything that was sent, so you can check it against the inventory before you start.
Will you need any tools to build your custom closet?
Just a few. Here's what we used:
- Hack saw (for cutting the steel rail to the correct length. This is because rail length is determined by wood stud locations).
- Level
- Stud Finder
- Tape Measure
- Drill
- Mallet
- Scissors
Install the steel rail
You'll start by installing the rail that runs along the back wall, attaching it to wood studs in the wall. Be sure to get it nice and level- as it holds the weight of the entire system.
Pro tip: Don't put the included track cover over the steel rail at this phase. You will later add that plastic cover to the exposed sections of the rail only- after cutting it into sections.
Hang the Vertical Panels

Once the steel rail is hung, you'll hang the vertical wall panels from the rail, and attach the top shelves. Be sure to follow the detailed instructions which will explain the spacing for your specific closet design.
Add Shelves, Drawers, and Hanging Rods
Once the panels are hung and the basic structure of the closet is in place, you just continue to follow the custom step-by-step instructions that are outlined for your particular closet.

It's really not too hard- just be patient and don't get frustrated if you have to re-do something you did in error at first!
Another thing that I love about this closet system, is that the shelves use a locking cam system so that they stay in place and do not slide in/out.

If you get stuck- you can find some helpful installation videos here This is an affiliate link: MomOf6 earns a commission if you purchase, at no additional cost to you. !
Let me Show You How Easy It Was for Us to Install our DIY Custom Closet!
Our Completed DIY Custom Closet!

Our new kids closet is just beautiful! With shelves that reach the top of their closet, and are 26″ long and 12″ tall- my daughters have so much more room for all of their clothing.

We designed their closets to have only a small amount of hanging space for each girl (18″ wide) as find that they fold most of their clothing anyway.

But their favorite parts are the panel front soft-close drawers!

This EasyClosets custom closet This is an affiliate link: MomOf6 earns a commission if you purchase, at no additional cost to you. solution allows my two teenage daughters to happily (and peacefully!) share one standard-sized closet. For us, it was well worth the investment!
 Looking for more great tools to organize your home?
Then be sure to check out these lists of my favorite Closet Organizing Tools This is an affiliate link: MomOf6 earns a commission if you purchase, at no additional cost to you. and Bathroom Organizing Tools This is an affiliate link: MomOf6 earns a commission if you purchase, at no additional cost to you. over on my Amazon influencer page This is an affiliate link: MomOf6 earns a commission if you purchase, at no additional cost to you. !
Here are some more great ideas on how to organize your home!
- 15 Fantastic Command Centers to Help Busy Moms Stay Organized
- 20 Organized Kids Bedroom Ideas
- 10 Organized Laundry Room Ideas
- 12 Organized Closet Ideas
- 12 Ideas for Entryway & Mudroom Organization

Leave a Reply